LED Chaser Using Arduino
Description
This project demonstrates how to build a simple LED chaser circuit using an Arduino UNO. Six LEDs are connected to six digital pins, and the Arduino lights them up one after another in sequence, creating a smooth chasing light effect similar to what you'd see on running LED displays or decorative lighting.
Each LED turns on briefly and then off as the next one lights up, cycling continuously through all six LEDs. This is a great beginner project to understand digitalWrite(), delay(), and how to control multiple outputs from an Arduino in a simple sequential pattern.
Components Required
| Component | Quantity |
|---|---|
| Arduino UNO | 1 |
| LEDs | 6 |
| Resistors (220Ω–330Ω) | 6 |
| Breadboard | 1 |
| Jumper Wires | As required |
Pin Connection Table
LEDs → Arduino UNO
| LED | Arduino Pin |
|---|---|
| LED 1 | D7 |
| LED 2 | D8 |
| LED 3 | D9 |
| LED 4 | D10 |
| LED 5 | D11 |
| LED 6 | D12 |
Wiring Notes
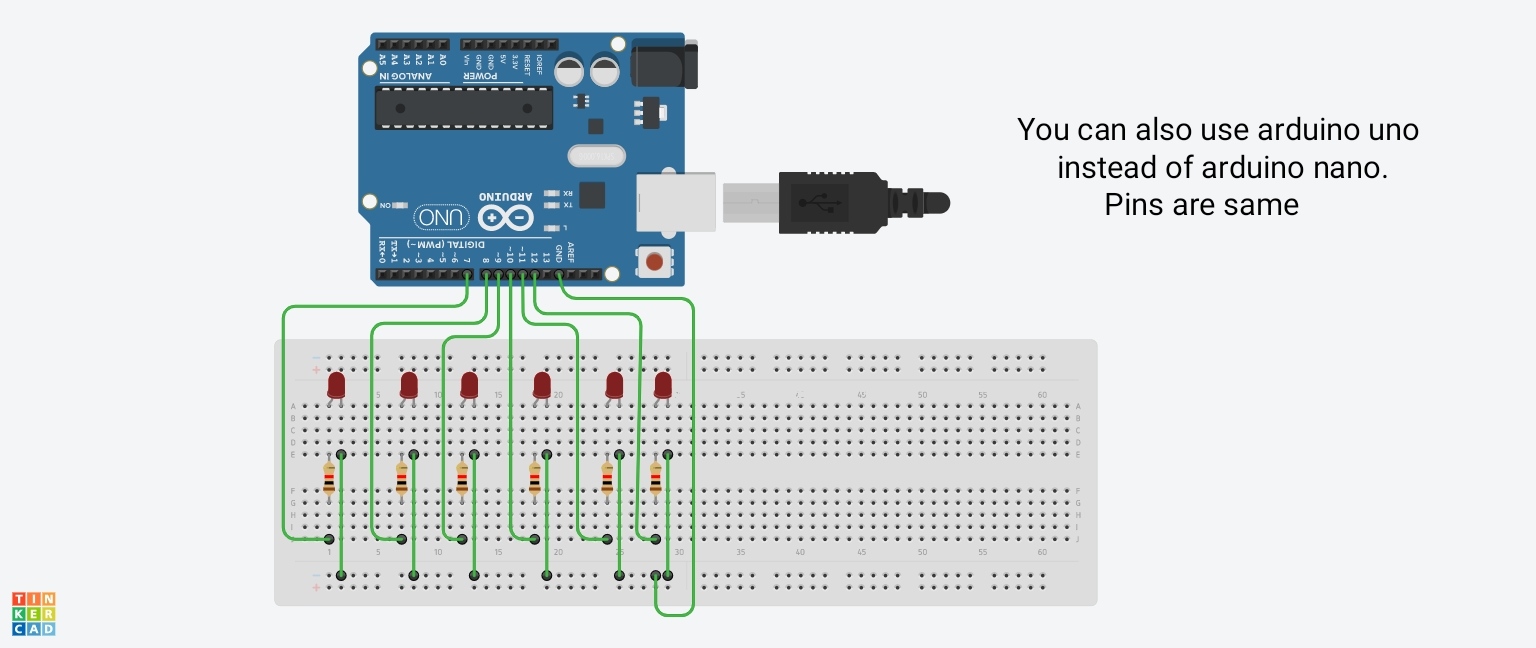
The positive leg (anode) of each LED connects to its corresponding Arduino digital pin. The negative leg (cathode) of each LED connects through a resistor to the breadboard's ground rail, which is then connected back to the Arduino's GND pin — completing the circuit for all six LEDs.
Circuit Diagram
Arduino Code
// Creative Inventions
// Subscribe to my Youtube channel

void setup() {
  pinMode(7, OUTPUT);
  pinMode(8, OUTPUT);
  pinMode(9, OUTPUT);
  pinMode(10, OUTPUT);
  pinMode(11, OUTPUT);
  pinMode(12, OUTPUT);
}

void loop() {
  digitalWrite(7, HIGH);
  digitalWrite(8, LOW);
  digitalWrite(9, LOW);
  digitalWrite(10, LOW);
  digitalWrite(11, LOW);
  digitalWrite(12, LOW);
  delay(100);

  digitalWrite(7, LOW);
  digitalWrite(8, HIGH);
  digitalWrite(9, LOW);
  digitalWrite(10, LOW);
  digitalWrite(11, LOW);
  digitalWrite(12, LOW);
  delay(100);

  digitalWrite(7, LOW);
  digitalWrite(8, LOW);
  digitalWrite(9, HIGH);
  digitalWrite(10, LOW);
  digitalWrite(11, LOW);
  digitalWrite(12, LOW);
  delay(100);

  digitalWrite(7, LOW);
  digitalWrite(8, LOW);
  digitalWrite(9, LOW);
  digitalWrite(10, HIGH);
  digitalWrite(11, LOW);
  digitalWrite(12, LOW);
  delay(100);

  digitalWrite(7, LOW);
  digitalWrite(8, LOW);
  digitalWrite(9, LOW);
  digitalWrite(10, LOW);
  digitalWrite(11, HIGH);
  digitalWrite(12, LOW);
  delay(100);

  digitalWrite(7, LOW);
  digitalWrite(8, LOW);
  digitalWrite(9, LOW);
  digitalWrite(10, LOW);
  digitalWrite(11, LOW);
  digitalWrite(12, HIGH);
  delay(100);
}